
In addition to being a visual annoyance, foggy or cloudy headlights can seriously impair your car’s visibility and safety, particularly at night. Over time, the lenses of your headlights can become hazy due to factors like UV exposure, road debris, or weather conditions. This cloudiness impairs the light output, making it harder for you to see the road and for other drivers to spot your vehicle.
In this article, we’ll show you how to repair foggy headlight lenses using simple techniques and professional methods, ensuring your headlights are clear and your driving experience is safer.
1. Why Do Headlights Fog?
Headlights can, with time, become foggy due to exposure to UV rays, road debris, and water, among others, leading to the loss of brightness and clarity. Plastic is utilized in the manufacturing of the external surface of a headlight lens, which can, upon continuous sunlight exposure, turn yellow or develop haze. UV rays degrade the lens, leading to oxidation and the loss of transparency.
In addition, grime, dirt, and water may build up on the surface, further producing the foggy appearance. Being aware of these causes enables you to easily address the issue for better vision and safety on the road.
2. Risks in Driving Using Foggy Headlights
Driving using foggy headlights is risky because reduced light emission may distort your eyesight as well as cause other motorists to have a hard time detecting your vehicle. Foggy headlights scatter the light, reducing beam intensity and blurring objects on the road, particularly at night or during inclement weather. This may lead to slower reaction time during emergencies and increase the chances of accidents.
Moreover, it can make your car less visible, making it more prone to accidents. Foggy headlights must be repaired for improved road safety for yourself and other individuals.
3. Simple Ways to Clean Foggy Headlights at Home
Cleaning foggy headlights is not necessarily professionals’ work, and it is simple to bring back the clarity of your headlights using materials available at home. Either you wish to improve the appearance of your headlights or the performance, there are a few simple ways that you can implement at home.
These techniques are cheap, quick, and will significantly enhance the brightness of your headlights. You can both enhance and make your headlights look nicer, and drive more safely, in a matter of minutes with some effort and common household items.
3.1. The Toothpaste Technique
Toothpaste is an inexpensive and efficient cleaning solution that is capable of eliminating the foggy residue on your headlight lenses. The mild abrasiveness of toothpaste works well to remove the oxidation and dirt that fogs your headlights. Just dab a tiny bit of toothpaste onto a gentle cloth, rub in circular motions, and then rinse with water.
This method can actually improve headlight clarity without causing harm. It’s great for minor fogging and provides a cheap remedy that won’t require professional tools or harsh chemicals.
3.2. Baking Soda and Water Solution
A water solution of baking soda is a mild abrasive to clean off the fogginess and improve headlight clarity. Since baking soda is an abrasive, it will remove oxidation and dirt from the lens surface without causing any harm.
To apply this method, Mix equal parts then apply it to the headlights, and then remove it with a clean cloth. Rinse the headlight using water after scrubbing. The free-of-charge and non-damaging procedure is not only economical but also a non-harmful way of cleaning hazy headlights and making them shine.
3.3. Vinegar and Baking Soda Combination
Foggy headlights can be effectively cleaned and loose dirt and grime broken up with a solution of vinegar and baking soda. Vinegar has the acidity to dissolve the cloudiness and oxidation, while the baking soda is an abrasive to clean the lens. In a bowl, combine the vinegar and baking soda, apply the paste to the headlights, and scrub with a soft cloth.Then rinse the headlights with water to reveal a cleaner, clearer lens.
4. Headlight Restoration Kit
If you want a more professional look, a headlight restoration kit will restore cloudy headlights with a long-term solution. These restoration kits are designed specifically to restore the clarity of your headlights by stripping away the oxidation layers and dirt that lead to fogginess. The majority of headlight restoration kits include abrasives, polishing compounds, and protective waxes that can return your headlights to original condition.
While these kits are a bit more time and effort-consuming than the DIY systems, they provide a more thorough and long-term solution to heavily fogged headlights.
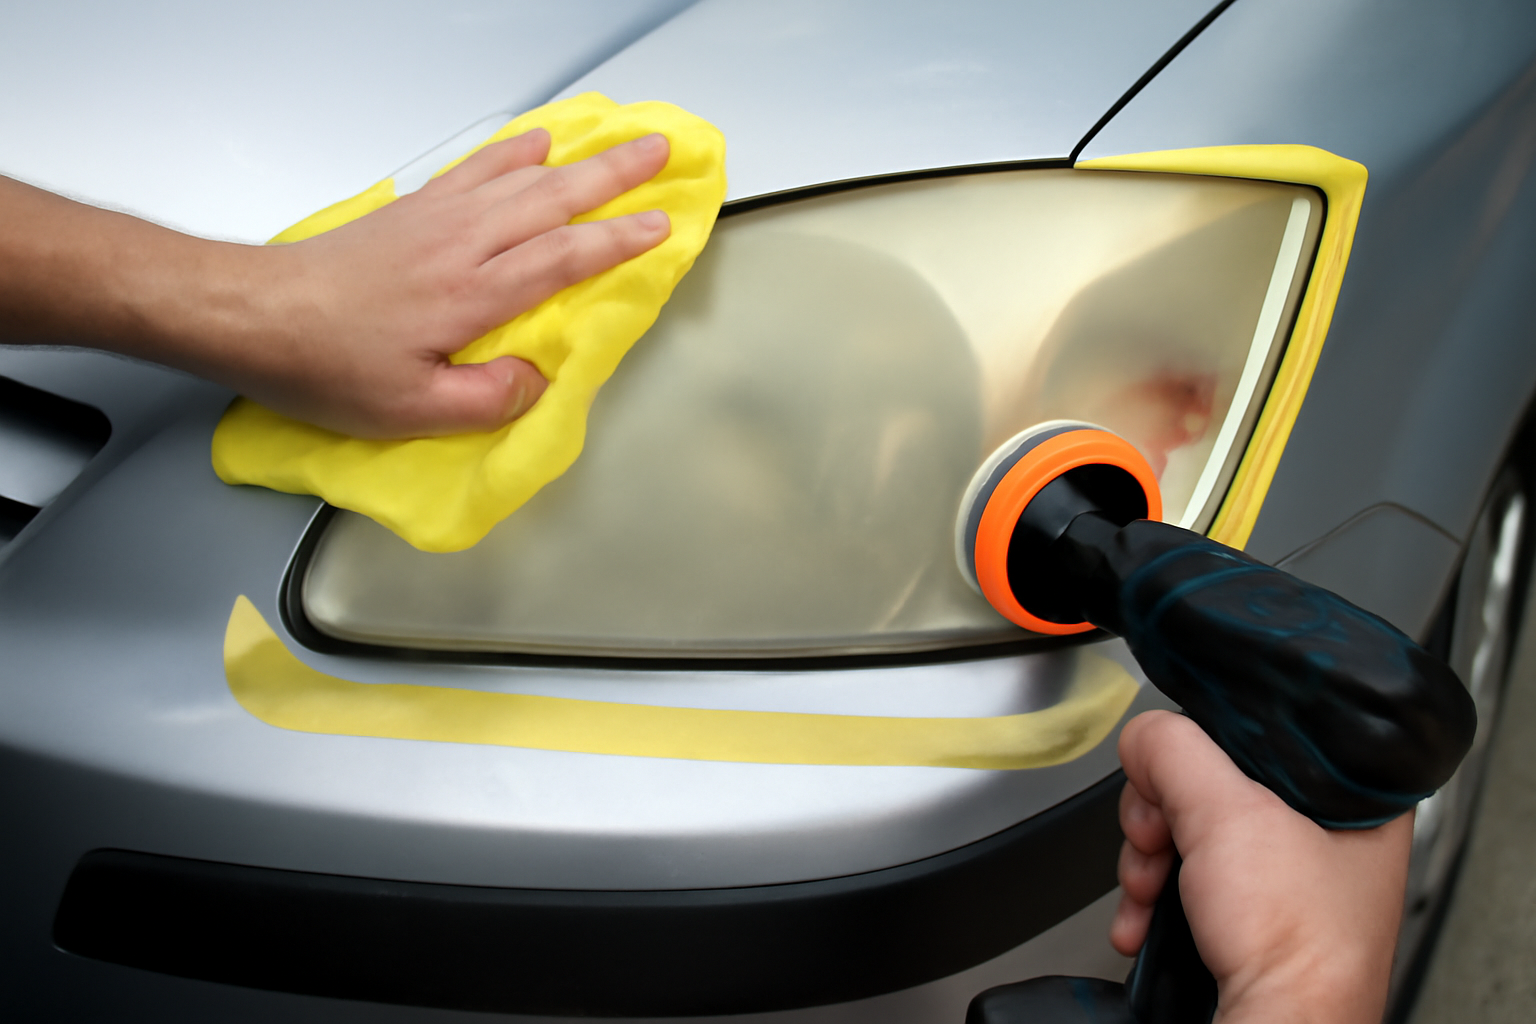
4.1. Headlight Restoration Kit Step-by-Step
Here is the step-by-step way in which you can use a headlight restoration kit to maintain your headlights like new:
- Prepare the Headlights: Before you do anything, wash the headlight lenses with soap and water thoroughly to remove any dirt or grime that may be present. This will help the kit work more effectively.
- Apply the Abrasive Compound: Use the applicator pad that comes with the kit to apply the abrasive compound to the headlight. Apply light pressure while rubbing it in a circular motion over the entire lens.
- Buff and Polish the Lens: After applying the compound, use the polishing cloth that comes with it to buff the headlight lens. This will start removing the oxidized layer and begin restoring the lens’ clarity.
- Apply the Polishing Compound: Now apply the second compound from the kit (most likely a fine polishing compound) to give a smooth, glossy finish to the headlights. It will enhance the clarity and get the headlight shining.
- Seal the Headlights: Use the protective sealant on the lenses last. This will ensure that the UV rays, moisture, and other impurities cannot penetrate into the headlights, keeping them clear for a longer period.
- Let It Dry: Allow the headlights to dry completely prior to driving the vehicle. This enables the sealant to bond properly with the lens for maximum protection.
5. Sanding and Polishing for Excessive Fogging
If there is excessive fogging, sanding and polishing can be used to reinvigorate the surface of the lens and regain its clarity. This process works best on headlights with deep scratches, heavy oxidation, or excessive fogging.
Sanding takes off the outer layer of the lens that is damaged due to UV radiation and weathering. Sanding comes after polishing, which smooths the surface even more and gives a shiny clear coat. Although sanding and polishing require a little more effort and care, they are suitable for headlights which cannot be cleaned with simpler methods.
5.1. Sanding the Headlights
Sanding can remove heavy fog and oxidation but must be done carefully and using proper technique not to damage the lens. Begin by wetting the headlight with water, then use a fine-grit sandpaper (typically 1000 grit) to sand the surface in a circular pattern.
Make sure to keep the lens moist throughout the process not to scratch it. After the first sanding, go ahead and use a higher grit paper (about 2000 grit) to achieve a more refined appearance. The process enables the stripping of the oxidized coating, restoring a clearer appearance on the headlights.
5.2. Polish the Lenses After Sanding
Headlight polishing after sanding will remove scratches and even enhance clarity and shine. Buff the headlights’ surface in a circular motion using a soft, clean cloth and polishing compound. Polishing brings back a shiny surface, making the headlights look clearer and brighter. There is a need to polish thoroughly to remove sanding flaws.
Using a high-quality car polish ensures that your headlights do not just look great but remain clear and shiny for a longer period of time.
6. Avoiding Future Fogging
After repairing your foggy headlights, it’s crucial to take action to ensure that the fogging doesn’t come back. Protective measures and regular maintenance can prevent the clarity of your headlights from being impaired and increase their lifespan.
Using a UV sealant or protective coating after cleaning and restoring the headlights protects them from the sun’s destructive rays and environmental pollutants. Also, regularly washing your headlights and inspecting them for damage will prevent the oxidation and grime that cause them to become cloudy and non-functional in the long run.
6.1. Applying a UV Sealant
You may also protect your headlights from sun damage and maintain their clarity in the long run by applying a UV sealant. This protective coating acts as a shield and does not allow the plastic lenses to contact damaging UV rays that contribute to oxidation and yellowing. Using a UV sealant following restoration of your headlights can dramatically extend their lifespan. Always adhere to the manufacturer’s guide for the sealant application, as this guarantees the most effective outcome. Through repeated use of UV protection, your headlights will remain clear, enhancing driving safety and visibility.
6.2. Maintenance and Regular Cleaning
Regular maintenance of your headlights and cleaning them can keep them clear and operational for longer. Periodic cleaning, such as washing the headlights as a part of regular car washes, will stop debris and dirt from building up on the lens. It is also advisable to inspect your headlights periodically for damage or fogging.
Detecting small instances of fogging early can prevent a bigger problem in the future. Consistent cleaning and maintenance will preserve the effectiveness of any headlight restoration work you’ve done and help your headlights remain in top condition.
Conclusion
By taking the time to repair and maintain your headlights, you’ll not only improve the aesthetics of your car but also ensure safer driving conditions, especially during nighttime or inclement weather.
Fogging headlights can seriously impair visibility, putting you and other drivers on the road in danger. Do it yourself, purchase professional restoration kits, or sand and polish: restoring your headlights to their best is essential.
Taking precautions to avoid fogging in the future will also keep your driving experience secure, unimpeded, and enjoyable for many years to come.

Hello there, this is Thomas Byrd. I am a professional car mechanic who leads a team of junior mechanics in a repair and restoration shop. In the beginning, I used to work for a jeep service center as a basic worker. From there I keep learning, changed my job 2 times and now I am a professional who leads a group of mechanics. Though a have expertise in the jeep, I know very well about all types of cars. To share my knowledge and skills with others I have created this blog website. Whenever I get free time from work I give my time to my blog.