
It is critical to learn how to change a headlight in a Jeep Grand Cherokee for the safety of driving. Headlights play a critical role in seeing while driving, especially at night or when driving in challenging weather, like rain or fog. A failed headlight reduces your ability to see dangers and hinders the ability of other drivers to spot you, making it more likely for accidents to occur.
Replacing faulty headlights on time gives you the maximum available light, assuring road safety. Headlight maintenance also spares you from fines and keeps your car in top shape to drive both at night and by day.
Tools and Materials Required
Before you start replacing the headlights, ensure that you have all the tools and materials required. The most important tool is a replacement headlight bulb of the same quality as your Jeep Grand Cherokee needs.
To take out the screws or bolts securing the headlight assembly in place, you will also need a socket wrench set. A flathead screwdriver is useful in gently prying off any clips or covers. To prevent scratches on the car’s paint, keep a towel or piece of cloth close at hand.
Having all your needed tools prepared in advance will make the procedure simpler and less hectic, and you can replace it in no time.
Preparing the Vehicle for Headlight Replacement
Start by getting your Jeep Grand Cherokee on a flat, firm surface to maintain stability while doing the replacement. Turn off the engine, and make sure that the vehicle is in “Park” for safety reasons.
For safety from any electrical accident, disconnect the negative terminal of the battery first before you perform the replacement of the headlight. The step safeguards from short circuits or electrical shock when working on the light system of the vehicle.
By following these precautions, you will be working safely and damage to the electrical components will be avoided during the process of replacing the headlight.
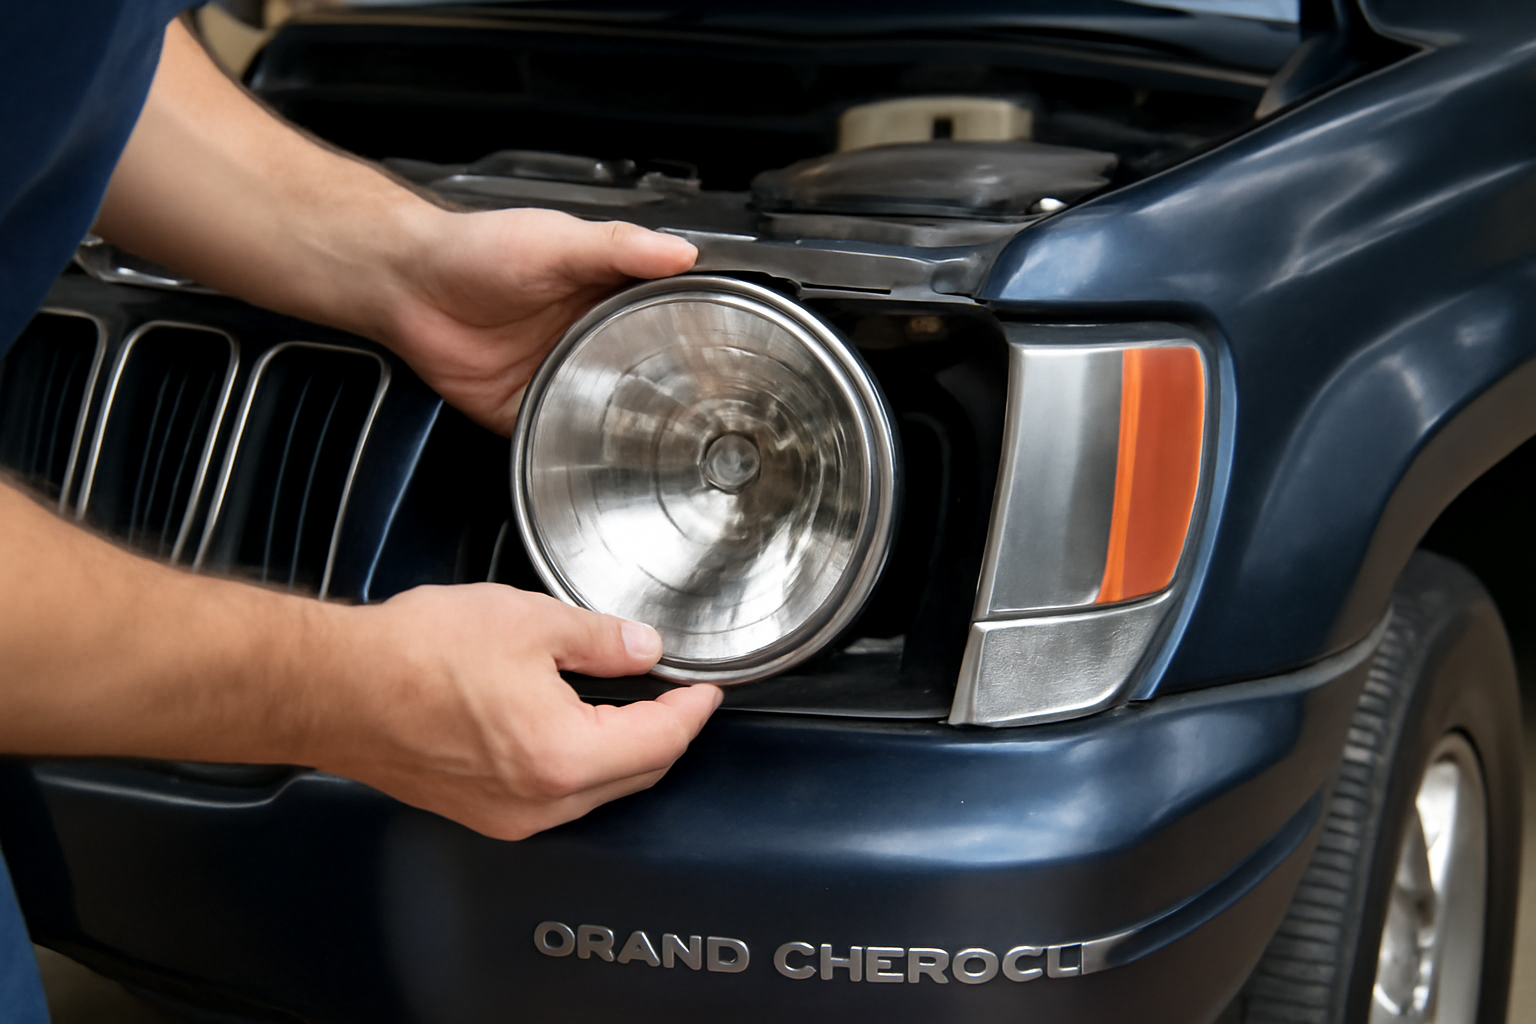
Entering the Headlight Assembly
Start by lifting the Jeep Grand Cherokee’s hood to access the headlight assembly. Locate the rear of the headlight housing that First, open your Jeep Grand Cherokee’s hood, depending on your model of vehicle. Check for any plastic covers or dust shields that may be in the way of the assembly to you.
It might be necessary to gently pry with a flathead screwdriver them loose if the removal of these covers or shields is required. With a good glance at the headlight assembly, you’ll be all set to go to replace the old bulb and put in the new one.
Removing the Old Headlight Bulb
With a socket wrench, remove the screws or bolts holding the headlight assembly in place. There are often many fasteners to be removed, depending on the model, so be patient. After removing the screws, pull the headlight assembly off the vehicle slowly to get to the bulb.
Be careful not to force it open if it’s stuck so you don’t hurt the wiring or housing. After removing the assembly, locate the bulb inside the housing and prepare to pull it out of the wiring to be replaced with the new bulb.
Removing the Bulb and Disconnecting the Wiring
After the headlight assembly has been removed, locate the wiring connector at the back of the bulb. Carefully pull out the connector by pushing the release tab and retracting the wire. Avoid pulling at the wires so that you do not break the connectors.
After establishing disconnection, you can then remove the old bulb from the assembly. See how the bulb is secured so that you can install the new bulb properly. Handle the old bulb with care as it may be warm if it has recently been in use.
Replacing the New Headlight Bulb
Take out the new headlight bulb and very carefully insert it into the headlight assembly’s bulb socket. Ensure it is properly seated in its position as it can only be seated once in the socket.
Once in place, reconnect the wiring by plugging the connector into the back of the new bulb. Be sure the connection is secure and there’s no loose wiring. It’s essential to handle the new bulb by its base to avoid touching the glass, because your skin’s oils can harm the bulb and reduce its lifespan. Once the bulb is installed, you’re ready to reassemble the headlight.
Reassembly of the Headlight Assembly
The new bulb is installed, and the headlight assembly is now ready to be reassembled. Put the housing back over the mounting points and secure the screws or bolts that were removed. Double-check that the assembly is properly seated and that there are no spaces between the headlight and the body of the vehicle.
If the clips or caps were taken out earlier, put them back so all of the pieces are secured. This is critical so that the headlight does not become loose or out of alignment and affect visibility or cause damage.
Testing the New Headlight
After the headlight assembly is reinstalled in full, reconnect the battery’s negative terminal. Start the vehicle and check the new headlight’s performance by cycling the low and high beams. Check that the new bulb is in good working condition and provides adequate illumination.
Tilt the headlight to its proper position, if necessary, to provide the best illumination on the road. Headlamp checks ensure that all is functioning as needed prior to your taking your car out for a spin, safe and visible at night or in low light.
Conclusion
Check your Jeep Grand Cherokee’s headlights routinely to ensure they are functioning correctly and avoid problems before they develop. Inspect the low and high beams from time to time and replace bulbs immediately as soon as they begin to fade or burn out. Proper maintenance of headlights does not only enhance your driving experience but also improves your safety by providing clear visibility under all weather conditions.
Keep your headlights free of dirt and grime to keep them bright. By performing regular replacements and maintenance, you are able to enjoy consistent, reliable lighting on the road, lessening the likelihood of accidents and resulting in a safer drive.

Hello there, this is Thomas Byrd. I am a professional car mechanic who leads a team of junior mechanics in a repair and restoration shop. In the beginning, I used to work for a jeep service center as a basic worker. From there I keep learning, changed my job 2 times and now I am a professional who leads a group of mechanics. Though a have expertise in the jeep, I know very well about all types of cars. To share my knowledge and skills with others I have created this blog website. Whenever I get free time from work I give my time to my blog.